What Spongy Brakes Actually Mean
Spongy brakes have gotten complicated with all the conflicting advice flying around. So let me cut through it. That mushy lever feeling — like you’re squeezing a stress ball instead of engaging actual stopping power — has a handful of real causes, and most of them are fixable in your driveway.
The lever travels halfway to the bars before anything happens. Or it bottoms out against your grip with almost no bite. Sometimes it’s inconsistent — firm one squeeze, dead the next. That inconsistency is actually a clue.
Here’s the distinction that changes everything about how you diagnose this: brakes that went mushy overnight are telling a different story than brakes that got progressively worse over three weeks. Sudden onset usually means air in a hydraulic line or a snapped cable. Gradual sponginess? That’s pad wear, cable stretch, or housing compression doing its slow work. Get this wrong and you’ll spend an hour fixing the wrong thing — trust me on that one.
Start Here — Check These Easy Things First
Probably should have opened with this section, honestly.
As someone who once spent two full hours chasing a phantom air pocket in my rear brake, I learned everything there is to know about starting at the wrong end of the problem. Turned out the lever clamp had backed off maybe a quarter inch during a ride. Two-minute fix. Two hours wasted. Don’t make my mistake.
Before you touch anything mechanical, run through these:
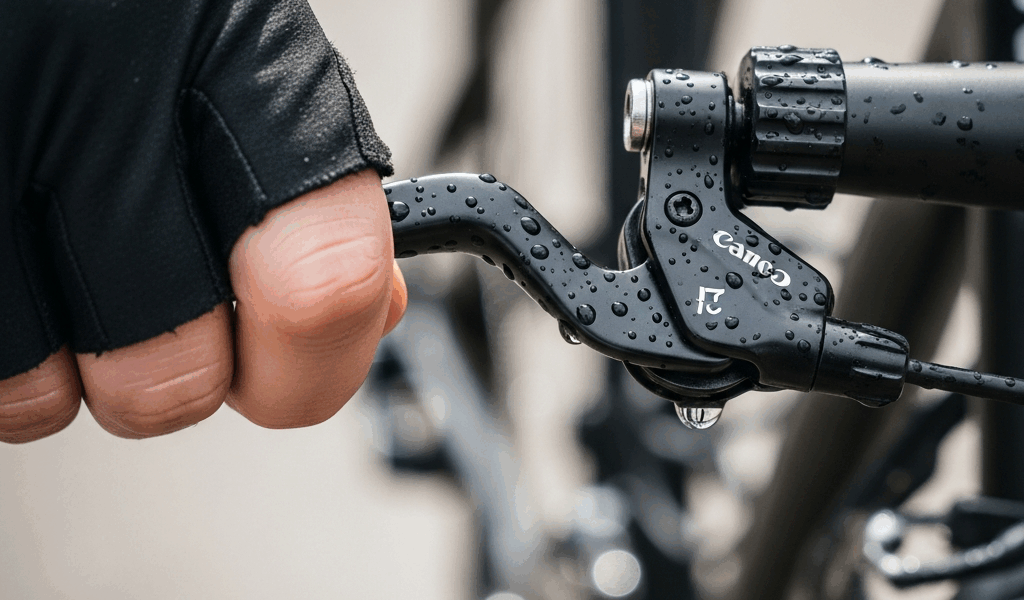
- Brake lever clamp. Reach under the lever where it clamps to the bars. A 4mm or 5mm hex key — tighten it fully. A loose clamp lets the lever shift independently of the brake mechanism. Fake sponginess, real frustration.
- Brake pad thickness. Look at the pads from the side. Most disc pads have a wear indicator groove molded right in. Rim brake pads have a minimum thickness around 1mm. Can’t see daylight between pad and rotor? Pads are bottomed out. Replace them.
- Contaminated pads. Glazed, shiny, or dark pads won’t bite. Wipe them down with isopropyl alcohol — the 91% stuff from the drugstore works fine. For hydraulic discs, check the rotor too. Even a fingerprint of oil on a rotor kills friction instantly.
- Cable anchor bolt. On mechanical disc and rim brakes, this is the small bolt on the caliper body where the cable terminates. Snug it down with a 3mm or 4mm hex key. A loose anchor bolt bleeds cable tension silently — your lever travel grows without any actual damage occurring inside.
- Visible damage. Cracked housings, kinked cables, bent lever bodies. These won’t respond to adjustment. They just need replacement.
This takes two minutes. Do it before moving forward.
How to Fix Spongy Hydraulic Disc Brakes
But what is the actual problem with hydraulic brakes? In essence, it’s air in the line. But it’s much more than that — it’s understanding why air matters.
Hydraulic fluid doesn’t compress. Air does. One tiny bubble sitting somewhere between your lever and caliper creates that dead zone feeling — that long, soft first half of the lever stroke before anything engages. That’s what makes hydraulic bleeding both the most important and most misunderstood fix in this category.
Identifying air in the line
Pump the brake lever five or six times without squeezing hard. Listen and feel for a subtle squishy response. Air bubbles make the lever get progressively firmer with each pump — it’s actually purging itself slightly just from the motion. If pump one and pump six feel identical, air probably isn’t the culprit.
Second test: hold the lever at half pressure for ten full seconds. If it slowly creeps toward the bar during that hold, you have air. Hydraulic fluid doesn’t creep. That slow drift is a bubble compressing under sustained load.
The bleeding process — what you need to know
Shimano and SRAM use completely different fluids and approaches — mix them up and you’re buying new brakes. Shimano runs mineral oil through a push-forward syringe system. SRAM uses DOT 5.1 or DOT 4 fluid with a reverse bleed — pulling fluid back through rather than pushing it. Magura uses mineral oil too, but with their own port geometry. Check the manual before you touch anything.
What actually happens during a bleed: you hook a small syringe to the bleed port on the caliper and reservoir, then move fluid through the entire line until bubbles stop appearing. Most first-time bleeds fail because people stop too early. The rule is simple — run fluid until it comes through clear with no visible bubbles, then keep running it another 30 seconds. That last 30 seconds catches the stubborn ones.
While you won’t need a full workshop setup, you will need a handful of specific items. The correct bleed kit — Shimano’s runs about $25, SRAM’s around $30–$40 — fresh fluid, nitrile gloves, and a clean surface. Expect 30 to 45 minutes per brake your first time. It gets faster.
Bled it twice and sponginess came back within a few rides? The internal seals in your lever are failing. That’s a shop job.
How to Fix Spongy Mechanical Disc or Rim Brakes
Barrel adjuster first — it’s 10 seconds
The barrel adjuster might be the best option to start, as mechanical brake diagnosis requires ruling out the simplest fix first. That is because cable tension is almost always the culprit, and the barrel adjuster changes tension without loosening a single bolt.
Find the small threaded cylinder where the cable housing enters your lever or caliper. Turn it counterclockwise half a turn. That shortens the housing, increases tension, and reduces lever travel. Try it. If the sponginess mostly disappears, you’re done — took ten seconds.
If the lever still feels dead, keep going.
Cable tension at the anchor bolt
- Find the anchor bolt on your caliper — the bolt clamping the steel cable in place.
- Loosen it one full turn with a 3mm or 4mm hex key.
- Pull the cable toward the lever with firm, steady pressure. You want taut, not over-tight. Two to three millimeters of hand movement is the target.
- Hold that tension and tighten the anchor bolt fully.
- Squeeze the lever. Should feel noticeably firmer immediately.
Cable stretch happens naturally — especially on bikes that see rain and gravel regularly. This adjustment might only hold 400 or 500 miles before you need it again. At that point, you’re not adjusting anymore. You’re delaying a cable replacement that’s already overdue.
For rim brakes — check pad alignment and pivot bolts
Spongy rim brakes often come from loose pivot bolts, not cable tension at all. That’s what makes rim brakes endearing to us traditionalists — the simplicity hides a few specific failure points that are easy to miss. The two bolts attaching the brake arm to the frame loosen with vibration over time. A 10mm wrench, snug but not cranked, usually solves it immediately.
Also worth checking: brake pad toe-in. Pads should contact the rim at a slight forward angle — leading edge hits first. Flat contact or toed-out contact kills stopping feel even with perfect cable tension. Adjusting this requires moving the brake arm itself, which is a bigger job, but knowing it exists saves you from blaming the wrong component for weeks.
When to Stop DIYing and Get a Bleed Done
Most spongy brake problems are fixable at home in under 30 minutes. Some aren’t. So, without further ado, let’s be direct about which is which.
Take your brake to a shop if any of these are true:
- You’ve bled a hydraulic brake twice and sponginess returned within a few rides. Lever seals are failing — no amount of fresh fluid fixes that.
- Your brake hose has visible cracking or damage. Hose replacement requires olive and barb fittings pressed in under specific torque. Not a wrench-and-hope situation.
- You’ve tightened the anchor bolt, wound out the barrel adjuster fully, and the lever still bottoms out against the bar with no stopping power. The cable is frayed inside the housing — adjustment can’t save it.
- You feel grinding inside the caliper during braking. Metal particles in the fluid, or internal seal failure. The entire system needs flushing — ideally by someone with a pressure bleed setup.
A shop bleed runs $25–$60 per brake depending on where you live. A ruined brake system from a botched DIY job costs $300 or more to replace. I’m apparently someone who learned this through expensive firsthand experience, and paying the shop rate works for me now while guessing never did.
That said — air, pad wear, cable stretch, loose hardware — nearly every spongy brake problem lands in one of those four buckets. All of them are solvable with 20 minutes, a hex key set, and the right starting point.

Stay in the loop
Get the latest cycling gear galaxy updates delivered to your inbox.