What Limit Screws Actually Do
Derailleur adjustments have gotten complicated with all the conflicting advice flying around. Limit screws, barrel adjusters, cable tension — most guides mash them together like they’re the same thing. They’re not. So let me separate them out for you, starting with the part people mess up most.
But what is a limit screw? In essence, it’s a physical stop — a tiny threaded bolt that tells your derailleur “this far, and not one millimeter more.” But it’s much more than that, because without it, your derailleur is just a spring-loaded arm swinging freely left and right, happy to throw your chain into your spokes or grind it against your frame.
You’ve got two of them. The H screw — high gear — stops the derailleur from overshooting toward your smallest cog. The L screw — low gear — stops it from swinging too far toward your largest cog and into the frame. Quarter turns. Physical stops. That’s the whole mechanism.
They don’t touch cable tension. They don’t affect shift speed. They just set hard boundaries — like bumpers on a pinball machine. Once they’re set correctly, the derailleur physically cannot overshoot. Most guides lump these in with barrel adjuster tuning, which is exactly why people end up turning the wrong screw for twenty minutes and making everything worse. I did that once — spent a full afternoon chasing what I thought was a cable tension problem before noticing my L screw had backed itself out halfway.
Signs Your Limit Screws Need Adjusting
Probably should have opened with this section, honestly. Most people who think they have a limit screw problem actually have a cable tension problem. These symptoms are different. Know them before you touch anything.
- Chain drops off the cassette — Falls past your smallest cog toward the spokes, or past your largest cog toward the frame. That’s almost always a limit screw issue, full stop.
- Derailleur won’t reach the largest cog — You click into your easiest gear and the chain stops one or two cogs short. Your L screw is wound too tight.
- Derailleur won’t reach the smallest cog — You go for your hardest gear and the chain stalls out early. H screw is too tight.
- Skipping or clicking only at the extremes — Chain chatters specifically in your easiest or hardest gear, nowhere else. The derailleur can’t get close enough to sit cleanly under the cog.
- Cage rub only at the ends of your range — You hear scraping in the smallest or largest cog but not in gears 3 through 9. That’s a limit problem, not a barrel adjuster problem.
If your chain skips across the middle of the cassette, or shifts sluggishly everywhere, stop — those are cable tension symptoms. Don’t make my mistake of spending an hour adjusting limits when the barrel adjuster needed a half turn.
Tools You Need Before You Start
While you won’t need a full workshop, you will need a handful of basic items — and honestly, barely even that.
One screwdriver. That’s the list. Most modern derailleurs — Shimano Altus, Deore, SRAM NX, Microshift Advent — take a standard Phillips head, usually a PH1 or PH2. If you’re running something older, a vintage Campagnolo Record or a pre-2000s Shimano 105, you might need a 1.5mm or 2mm flathead instead. Check before you start.
A bike stand might be the best option, as limit screw work requires you to spin the pedals while watching the derailleur. That is because you need both hands free and the rear wheel off the ground. That said, I’ve adjusted derailleurs with a Leatherman Wave in a gas station parking lot with the bike flipped upside down on a jacket. It works. A stand just makes it faster.
How to Adjust the H and L Screws Step by Step
Rear Derailleur — H Screw (High Gear Limit)
The H screw controls how far toward the smallest cog the derailleur can travel. This is your starting point.
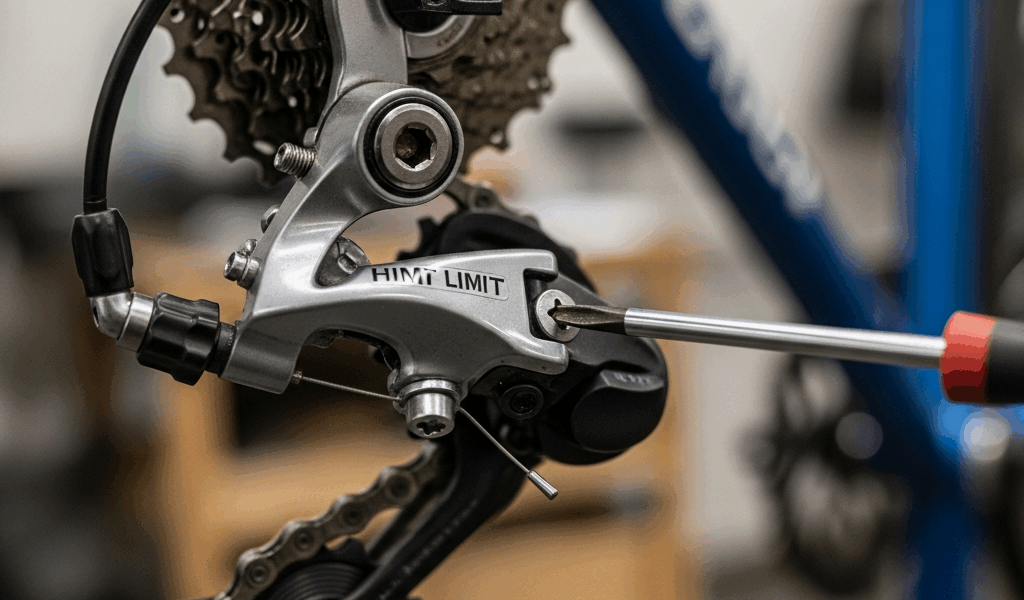
Step 1: Find the H screw. On virtually every rear derailleur made in the last 30 years — Shimano, SRAM, Microshift, Sensah — it’s the screw sitting closest to the cassette when you view the derailleur from behind. It’s marked H. Hard to miss once you know what you’re looking for.
Step 2: Shift the chain onto the smallest cog. Hardest gear on the rear. If you’re on a 11-speed setup, that’s your 11t or 10t cog up front in the rotation.
Step 3: Watch the guide pulley — the small jockey wheel directly beneath the cassette. It should sit in a clean vertical line under the smallest cog. Drifting toward the spokes means the H screw is too loose. Sitting outside the cog means it’s too tight.
Step 4: Turn the H screw in quarter-turn increments only. Clockwise pulls the derailleur away from the cassette. Counterclockwise lets it swing closer. Shift the chain after every quarter turn and look again.
Step 5: Stop the moment the pulley sits directly beneath that smallest cog with zero lateral gap. Chain stays on, derailleur doesn’t rub. Done.
Rear Derailleur — L Screw (Low Gear Limit)
Same logic, opposite end of the cassette.
Step 1: The L screw sits farther from the cassette — marked L, toward the outside of the derailleur body.
Step 2: Shift into your largest cog. Easiest gear. On a 1x setup that’s typically a 42t, 50t, or 52t cog depending on your range.
Step 3: Check the pulley alignment again. Too far from the largest cog means the L screw is binding the swing. Too close — cage threatening the chainstay or dropout — means it’s backed out too far.
Step 4: Quarter turns only. Same direction logic as before — clockwise tightens, counterclockwise loosens. Shift and observe after each adjustment.
Step 5: Stop when the chain sits cleanly on that largest cog and the derailleur cage has a small but visible gap from the frame. That gap matters. I’m apparently someone who likes to run things close, and running the cage too tight against the chainstay never ends quietly.
Front Derailleur — The Quick Version
Front derailleurs work on the same principle — just different geography. The H screw stops the cage from swinging too far outward, away from the frame, past your largest chainring. The L screw stops it from swinging inward toward the seat tube. Adjustment process is identical: quarter turns, watch the cage position relative to the chainring, stop when aligned. The difference is you’re watching the cage plate clear the chain by about 1–2mm rather than lining up a pulley. Same patience, different reference point.
How to Test and Confirm the Fix
Don’t just click through two gears and call it done. Test the full range.
Shift through the entire cassette — Smallest to largest, then back. Every cog. The chain should pick up each one cleanly without hesitation, grinding, or any drama at either end.
Listen at the extremes — Pedal slowly in your hardest gear, then your easiest. You should hear nothing. Grinding at either end means the derailleur is still brushing something it shouldn’t.
Try to drop the chain manually — Shift into your hardest gear and gently press the chain outward toward the spokes with your finger. It shouldn’t move past the cog. Do the same toward the frame in your easiest gear. If the limit is set right, it won’t budge.
If the chain still drops after all this, or noise persists, you’re likely dealing with something else entirely — a bent derailleur hanger, a stretched cable, a worn 11-speed cassette that’s seen too many miles. Those need different fixes. But if your limits are dialed and symptoms are still there, that’s the shop’s problem now, not the screwdriver’s.

Stay in the loop
Get the latest cycling gear galaxy updates delivered to your inbox.