What Cable Housing Actually Does on Your Bike
Bike maintenance has gotten complicated with all the conflicting advice flying around. But cable housing is one of those things nobody explains properly — until something goes wrong and you’re standing in a parking lot squeezing a brake lever that feels like wet cardboard.
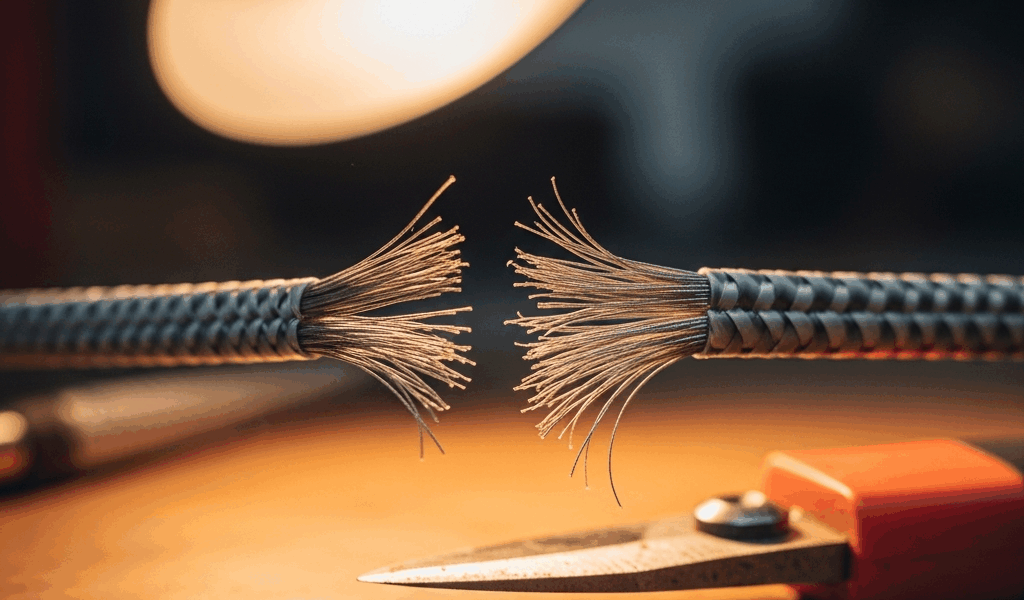
So what is cable housing? In essence, it’s a protective tube wrapped around the thin steel cable that connects your hands to your brakes and derailleurs. But it’s much more than that. Every time you squeeze a brake lever or click through a gear, that housing absorbs compression stress while the inner cable pulls taut. The structure is layered — a plastic or nylon outer sheath, a coiled wire underneath, kind of like a garden hose that’s been engineered to flex without collapsing. When it works, you never think about it. When it fails, you feel it in every shift and every stop.
That outer sheath breaks down over time. The wire starts poking through. And suddenly you’ve got fraying housing crumbling right in your hands during a Tuesday morning commute.
The Real Reasons Housing Frays and Splits
Age is the obvious one. I’ve seen bikes stored outside for two winters where the housing looked like something dragged through a paper shredder — brittle nylon, exposed wire coil, rust working its way inward. Cheap housing makes this worse. The $2 generic cable sets you find at discount shops use thinner nylon that starts cracking within a season. That’s not a deal. That’s a liability.
But honestly, age isn’t even the main culprit most of the time. Improper cutting probably causes more premature housing failure than anything else. Scissors crush the housing end instead of slicing it. Wire strippers are even worse. That crushed edge splinters. The coil at the tip becomes a compressed, uneven mess rather than a clean, tight ring. Within a few weeks of riding, that rough end starts unraveling from the inside out.
Proper cable cutters — the kind with opposing blades that shear cleanly — run about $12 to $18. The Park Tool CC-4 is the standard recommendation. Shimano makes decent ones too. Don’t make my mistake of using hardware store wire cutters for three years wondering why my housing always looked rough at the ends. One pair of real cable cutters fixes that permanently.
Moisture intrusion is the second silent killer — especially at the ends where ferrules should be seated. Those tiny aluminum sleeves crimp onto the housing end and seal the entry point at your brake lever or derailleur. Skip them and water gets inside. The coil corrodes from the inside out. The nylon layer separates. You get fraying right at the contact point, which is also the highest-stress point. I learned this on my 2018 Trek — rode through rain for a full season without ferrules on the rear brake housing. Looked fine from outside. Was already garbage internally.
Cable tension set too high puts constant outward pressure on the housing at every bend. If your derailleur cable is cranked so tight the chain barely moves, the housing is expanding under that load. The outer layer cracks first. Over-tensioned brake housing ages twice as fast — I’d estimate a good housing lasts maybe 18 months under that kind of stress instead of three or four years.
Sharp routing bends finish the job. A 90-degree turn around a frame tube, or housing pinched flat by an overtightened zip tie — every cable flex hits that same crushed point. The nylon cracks. Fraying follows, almost always right there at the kink.
How to Inspect Your Housing Before It Causes Problems
Probably should have opened with this section, honestly. Do this inspection right now. Five minutes, no tools required.
Start at the brake levers. Run your fingers along the housing where it exits the hood — this spot gets missed constantly because your hands naturally grip past it. Feel for roughness, peeling nylon, any texture that shouldn’t be there. Check the ferrule at the entry point. Loose or missing entirely? That’s your problem zone.
Follow the housing down the frame. Press gently as you go. Healthy housing feels firm but has slight give. Mushy or crumbly under light pressure means degradation. Wire coil visible anywhere along the run means replace it this weekend — that’s a safety issue, not a cosmetic one.
The rear derailleur cable takes the most abuse. It routes around multiple frame tubes, often runs exposed along the chainstay, and flexes constantly. Check both ends. Fraying at the derailleur body causes sluggish shifts and that maddening cable rattle on rough pavement.
On brake cables, check where the housing enters the caliper. Fraying there creates air entry points. Your brakes feel spongy even though nothing else has changed — no stretch, no contamination, just compromised housing letting the system breathe when it shouldn’t.
Fraying only at one end with the rest of the run intact? That’s cosmetic. Replace it when you get around to it. Fraying along the run or exposed wire anywhere? This weekend. No negotiating.
How to Replace Frayed Cable Housing Step by Step
While you won’t need a full workshop setup, you will need a handful of specific things: cable cutters, ferrules, replacement housing, and maybe a cable lube. No bike stand required — I do this on my kitchen floor.
First, you should measure — at least if you want to avoid cutting twice. Loosen your cable anchor at the brake lever or derailleur. Slide the old housing off the cable. Hold it against the new housing and mark the length. Cut using your cable cutters with the housing centered in the cutting chamber. One smooth squeeze. The cut end should show a tight, clean wire ring — not crushed, not splayed. If it looks wrong, trim a millimeter and try again. This detail matters more than most people realize.
Slide a ferrule onto the cable end before seating the housing. Always. The ferrule prevents the housing from compressing inside the lever or derailleur body under cable load. Crimp it using the ferrule notch built into most cable cutters — the Park Tool CC-4 has this — or use a dedicated ferrule tool if you want to be precise about it.
Seat the housing firmly. You’ll feel a small click or snap when it’s properly seated in a lever or cable stop. Tug on it. No movement means you’re good.
Route the new housing along the existing path. Follow the old line exactly — it was designed around your frame geometry. Create gentle curves around frame tubes rather than hard angles. Zip ties should hold the housing snug, not deform it. If the housing flattens under the tie, loosen it half a turn.
Set cable tension and test. Shifting should feel crisp and immediate. Braking should feel solid with zero sponginess at the lever.
How to Make Your New Housing Last Much Longer
Use ferrules every single time. No exceptions. They’re about 50 cents each and they’re doing real work keeping moisture and compression damage away from the housing ends.
Apply cable grease or light lubricant at the entry points — where housing meets lever, derailleur, or brake caliper. A small amount keeps friction down and moisture out. I’m apparently particular about this and Shimano Dura-Ace cable grease works for me while generic chain lube never quite does the job right at those contact points. That said, any dedicated cable lubricant beats nothing.
Check housing every three to six months. Run your fingers along the full run. Look for cracks, peeling, or discoloration. Early detection means a $6 housing replacement instead of a seized cable at the worst possible moment.
Don’t strangle housing with zip ties. Snug is the target. The housing needs to flex slightly as you shift and brake — that’s its entire job. A tie that deforms the housing cross-section creates a permanent weak point.
Replace housing every two to three years under regular riding conditions. Every season if you’re in a wet climate or the bike lives outside. A complete housing and cable set — brake and derailleur, front and rear — runs about $25 to $35 for decent quality. Jagwire makes reliable sets. Shimano’s OEM housing is solid. That’s preventive maintenance that pays back immediately in feel, and keeps you out of roadside mechanical situations that ruin otherwise good rides.


Stay in the loop
Get the latest cycling gear galaxy updates delivered to your inbox.