Why Clipless Pedals Stick in the First Place
Clipless pedals have gotten complicated with all the conflicting advice flying around. As someone who has face-planted at a red light because my foot wouldn’t unclip, I learned everything there is to know about this particular mechanical nightmare. Today, I will share it all with you.
This article includes affiliate links. We may earn a commission at no extra cost to you.
So, without further ado, let’s dive in.
There are exactly three mechanical reasons this happens. They stack in order of likelihood, which matters a lot when you’re troubleshooting. First: spring tension set too high. Most riders — especially new ones — crank the release tension all the way up, terrified they’ll accidentally pop out mid-climb. The spring then grabs the cleat so aggressively that a hard heel twist just isn’t enough. The pedal wins. You wobble.
Second is cleat wear or misalignment. But what is cleat wear, exactly? In essence, it’s the engagement groove rounding out from thousands of clip-in cycles. But it’s much more than that — even a few degrees of rotational drift in your cleat position changes how the jaw grips and releases. You won’t see it happening. Then one day, you’re tipping sideways at a stoplight.
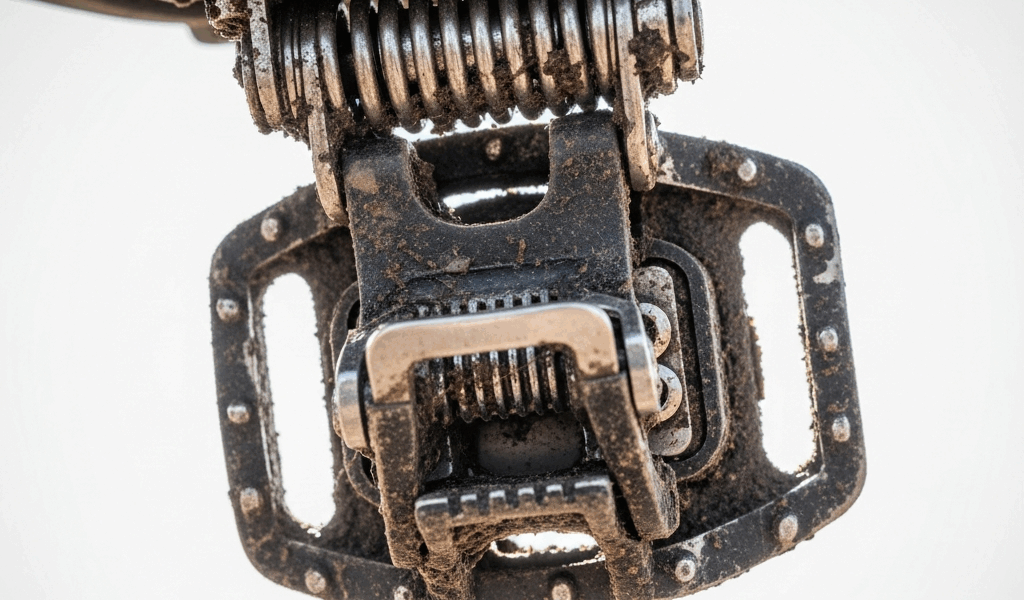
Third is contamination. Mud, dried lube, rust, grit jammed between the cleat and pedal body — debris physically stops the spring from returning to its open position. This one hits gravel riders hardest. That’s what makes the problem so maddening to us off-pavement types: everything looks fine from the outside.
Step 1 — Check and Back Off the Release Tension
Start here. Seriously. I skipped this the first time and spent two hours cleaning and inspecting perfectly functional pedals. Don’t make my mistake.
Every clipless pedal has a tension adjustment bolt. Shimano SPD pedals — the M520s, the M8100s, all of them — put the bolt on the back face of the pedal body. Flip the pedal toward you and it’s right there, usually a 2mm or 3mm hex fitting. Look Keo systems mount theirs on the lateral face instead. Time ATAC goes back-of-body, same as SPD. A standard Allen wrench handles all of these. Sometimes a coin works in a pinch.
Here’s the process:
- Locate your tension bolt and note its current position
- Back it off two full counterclockwise turns
- Put on your shoes and cleats, snap in, and test the release with a firm heel twist
- If it releases too easily, tighten by one-half turn and test again
- Repeat until release requires deliberate effort but happens cleanly
The target feel: a confident heel twist releases you. Not a gentle wiggle — but also not a desperate, two-attempt struggle. New riders almost always land at “heroic effort required” and assume that’s normal. It isn’t. Back the tension off until the release is clean, then creep it back up until it feels secure. That middle ground exists. Find it.
If you’ve backed the bolt all the way out and the pedal still won’t release, tension isn’t your problem. Move to Step 2.
Step 2 — Inspect the Cleat for Wear or Misalignment
Worn cleats are a silent killer. You don’t notice it happening — the engagement groove rounds out gradually, hundreds of rides, and one day your foot simply isn’t coming free.
Pull your shoe off and look at the cleat face directly. Most cleats — SPD, SPD-SL, Keo, ATAC — have a wear indicator molded right into the plastic. It’s a line or a small mark showing how much material remains. Gone or nearly gone? The cleat is done. Replacement runs $40–$90 depending on your system. Just replace it. Arguing with a worn cleat is a losing proposition.
Probably should have opened with this section, honestly. A fresh $50 cleat fixes more stuck-pedal complaints than anything else on this list. The Shimano SM-SH51 SPD Cleat Set is the standard replacement for most SPD systems and comes with the Allen wrench you need for installation.
If the wear indicator is still visible, check alignment next. SPD and SPD-SL cleats bolt to the shoe sole on two or three bolts with some rotational adjustment built in. Keo cleats offer fore-aft and rotational movement. Look closely at how the cleat sits relative to your shoe’s centerline — is it twisted even slightly left or right? That matters. A smartphone level app works well here if you want precision, though honest-to-god eyeballing usually gets you close enough. Loosen each bolt, true it up, and snug everything back down firm. Not gorilla-tight — you can strip the threading on a shoe sole embarrassingly fast. Ask me how I know.
Step 3 — Clean the Pedal Mechanism and Cleat Contact Points
I’m apparently a mud magnet and gravel riding works for me while dry pavement never reveals the contamination problem. After a wet March ride on my local fire road loop, I spent nearly an hour convinced my spring mechanism was broken. It was just caked with mud. Completely packed.
Here’s how to clean properly:
- Use a stiff brush — an old toothbrush works — to scrub the pedal body, paying special attention to the spring housing and the jaw cavity
- Rinse with plain water. No pressure washer. Pressure washing forces water into sealed bearing areas and creates new problems
- Let it air dry completely, or use a hair dryer on the cool setting
- Inspect the cleat contact surfaces on both the cleat and the pedal jaw — visible mud or rust gets brushed off
- Apply a small amount of dry lube or light synthetic grease to the cleat contact face and pedal jaw
Critical note: wet lube — the thick stuff you’d use on a chainring — has no business near cleat contact surfaces or the spring pivot. It gums up the mechanism. Dry lube only. Some mechanics prefer a light spray lube applied briefly, then wiped nearly clean. Either works. Wet lube doesn’t.
Test the release after cleaning. For gravel riders especially, this step alone often closes the case entirely.
When to Replace the Pedals or Cleats Entirely
Knowing when to stop troubleshooting and just buy new parts saves hours. Here’s the actual threshold:
Replace the cleats if:
- The wear indicator is gone
- The engagement groove is visibly rounded
- They’re more than three years old and see regular use
Replace the pedals if:
- The spring won’t hold tension even at its maximum setting
- The pedal body has visible cracks or damage to the engagement jaw
- The spring feels weak or loose when you manually flex it
- You’ve backed off the tension all the way and the cleat still won’t release
Cost context: replacement cleats run $50–$90. Replacement pedals run $80–$250 depending on the system — a set of Shimano SPD-SL R8000s sits around $180, while basic SPD M520s come in well under $100. Cleats are the obvious first move, budget-wise. But a damaged pedal body or blown spring won’t be fixed by fresh cleats. Know the difference before you spend anything.
This is normal maintenance. Pedals and cleats are wear items, same as brake pads or chain. They’re not failing because you bought bad gear. They’re failing because you actually ride — which is the whole point.
Start with tension. Move to cleats. Then clean. In that order, you’ll solve 95 percent of release problems without special tools, a bike shop visit, or a credit card.

Stay in the loop
Get the latest cycling gear galaxy updates delivered to your inbox.