Why Your Bike Gears Skip and How to Fix It
Bike gear skipping has gotten complicated with all the conflicting advice flying around. Replace the cassette. Buy a new derailleur. Take it to a shop. Most of that is overkill. As someone who spent three full seasons chasing phantom mechanical problems, I learned everything there is to know about diagnosing a skip before touching a single bolt. Today, I will share it all with you.
Probably should have opened with this section, honestly. I’d swap chains, adjust hangers, replace cables — sometimes all in the same afternoon — only to discover the actual culprit was something embarrassingly simple. Don’t make my mistake. A methodical diagnosis saves you real money. We’re talking the difference between a free five-minute fix and a $140 cassette you didn’t need.
So, without further ado, let’s dive in.
How to Tell What Is Actually Causing the Skip
Skipping feels identical every time — chain jumps a tooth, pedal power vanishes for half a second, everything feels catastrophically broken. But what is a skip pattern? In essence, it’s the specific circumstances under which your chain loses grip. But it’s much more than that. The pattern is your diagnosis.
Start here. Does the skip happen:
- Only under heavy load? Sprinting, climbing, pushing hard — and the chain slips. Cable tension or a bent hanger. The derailleur isn’t holding firm when it matters most.
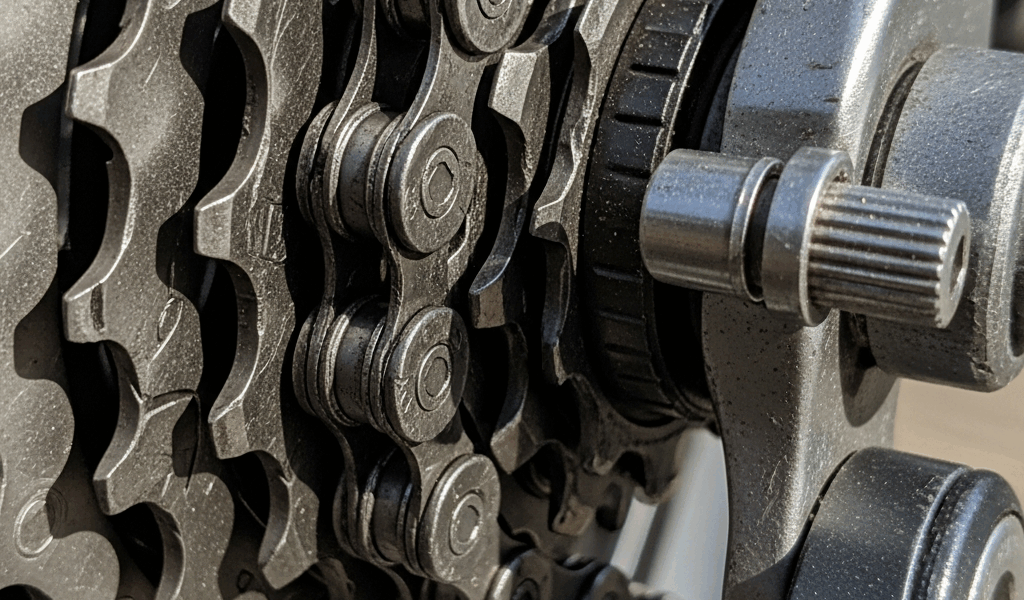
- On one specific gear only? Always the 7th cog. Always the biggest ring. That screams worn chain or worn cassette teeth on that particular gear. The chain simply won’t mesh cleanly with it anymore.
- Randomly across the whole cassette? 3rd gear, then 6th, then 2nd — no real pattern. Your chain is shot, period. A stretched chain won’t grip any cog reliably under load.
- During shifting but not while pedaling steady? The derailleur cable is too loose. It’s not pulling the chain over cleanly, so it either slips backward or overshoots the target cog entirely.
Write down which pattern matches yours. You just eliminated two or three potential fixes before touching anything.
Fix 1 — Adjust Your Rear Derailleur Cable Tension
Cable tension problems solve the skip for roughly half the people reading this. It’s also completely free and takes about five minutes — at least if you know what you’re feeling for.
Flip your bike upside down or hang it from a repair stand. Find the barrel adjuster on your rear derailleur — the cylindrical knob where the cable feeds into the derailleur body. Some bikes have it there; others put it on the down tube or chainstay. Spin the cranks slowly and work through every gear.
Here’s what to notice. Shifting up toward harder gears — does the chain move cleanly, or does it hesitate and almost miss? That’s slack cable. The derailleur isn’t pulling hard enough to drag the chain over the cog. Shifting down toward easier gears — does the chain rattle, buzz, or dive too far toward the spokes? That’s too much tension. The cable is yanking the derailleur too far inward.
The fix: Turn the barrel adjuster counterclockwise a quarter turn to increase tension. Shift. Feel the difference. Still not clean? Another quarter turn. Got worse? Turn it clockwise. Small increments only — I’m apparently heavy-handed with barrel adjusters and Park Tool’s barrel adjusters work for me while cheap plastic ones never survive my corrections. A quarter turn at a time. Seriously.
The sweet spot is unmistakable. Upshifting snaps cleanly. Downshifting is quiet and quick. No hesitation, no rattle, no chain drift while holding a single gear steady.
If honest tweaking didn’t solve it, move on.
Fix 2 — Check and Replace a Worn Chain
A worn chain is the second most common culprit. Easy to identify, too — grab a chain checker tool. They run $8 to $15 at any shop. Park Tool CC-2, Shimano TL-CN42, generic versions from Amazon. All work fine.
Hook it onto a link on the top run of your chain and let it hang. Most checkers have two notches. Doesn’t drop into the first notch — chain is fine. Drops into the first but not the second — you’re at the wear threshold, start budgeting. Drops into the second notch — replace it today, not next week.
No tool? Use a ruler. New chain link spacing measures exactly 12.7 millimeters center-pin to center-pin across twelve links. At 12.8 to 12.85mm, it’s getting loose. Over 12.9mm and it’s done. That was the measurement that finally convinced me to stop procrastinating on a chain replacement two summers ago.
Why this matters so much: a stretched chain won’t mesh cleanly with cassette cogs. The teeth are still sharp and evenly spaced — the chain is the problem. It slips under load. And here’s the brutal part. Ignore that worn chain and keep riding, and it grinds your cassette teeth into a hooked shark-fin shape. Now you’re replacing both. A chain runs $30 to $50. A cassette runs $60 to $150. Catch the chain early.
Replacement takes five minutes with a chain tool or ten minutes at any LBS. Match your drivetrain speed — 9-speed, 10-speed, 11-speed, 12-speed. Shimano, KMC, SRAM all work well.
Fix 3 — Inspect the Derailleur Hanger for a Bend
Frustrated by a skip that cable tension and chain replacement couldn’t solve, I finally borrowed a hanger alignment tool from a friend and found my hanger was bent nearly 4 millimeters inward — using nothing but a crash I’d completely forgotten about. That was 2019. Solved the problem instantly.
The derailleur hanger is a thin metal arm bolted to your frame’s dropout. It’s designed to bend intentionally so the derailleur survives impacts instead of shattering. A bent hanger throws off derailleur alignment, and misalignment means skipping under load.
Visual test first: shift to the smallest cog, look from directly behind the bike. The upper jockey wheel should sit directly behind that cog — maybe a millimeter away. If it looks offset at all, the hanger is bent. Straight-edge test: hold a metal ruler against the frame in line with the cassette. Does the derailleur hang parallel? Any inward or outward angle means it’s bent.
Minor bend under 2 millimeters — a Park Tool DAG-2 hanger alignment tool (around $70 at most shops) handles it. Loosen the derailleur bolt slightly, use the tool to pry in small increments, check alignment constantly. Tedious but very doable. Severe bend, or if you’re not confident about snapping it — just replace the hanger. They run $20 to $40 and bolt on in two minutes. A snapped hanger mid-ride means walking home, and that’s not a fun afternoon.
When the Skip Is Still There — Cassette and Jockey Wheels
You’ve adjusted the cable, replaced the chain, straightened the hanger. Still skipping. Now we’re in less common territory — but not uncharted.
Look closely at the cassette teeth. Shark-fin shape, hooked forward? That’s a worn cassette. The teeth can no longer grip a fresh chain properly, and no amount of cable adjustment will fix geometry that’s physically gone. Worn cassettes run $60 to $150 depending on speed count and brand — Shimano CS-HG500, SRAM PG-1130, Microshift if you’re budget-conscious. Expensive fix. Necessary fix.
Check the jockey wheels next. Spin them by hand. Sluggish? Teeth chipped or visibly rounded? Sticky jockey wheels don’t guide the chain smoothly — they cause the same slipping symptoms as everything above. Jockey wheel sets run $20 to $40 and swap out in five minutes. While you won’t need a full workshop to handle this, you will need a handful of basic tools — 3mm and 5mm Allen keys, and a rag you don’t mind destroying.
Both worn? Replace both together. That’s what makes a complete drivetrain service endearing to us obsessive home mechanics — everything gets fresh at once, and the system actually works as designed again.
That covers the full diagnostic tree. Cable tension or chain replacement solves most skips. If you’ve made it all the way to cassette replacement, at least you know that’s genuinely what’s needed — instead of guessing at a shop counter with a perfectly good derailleur in your backpack.


Stay in the loop
Get the latest cycling gear galaxy updates delivered to your inbox.