Presta vs Schrader Valve — Why Your Bike Has That Weird Valve
The presta valve vs schrader advantage question is one of the first things that genuinely confused me when I started working in a bike shop about twelve years ago. A customer would roll in with a brand-new road bike, try to top up the tires at the gas station across the street, and come back completely baffled. “The pump doesn’t fit.” Right. Because road bikes use a completely different valve than cars, mountain bikes, and basically everything else the average person has ever inflated. There’s a reason for that. A real engineering reason, not just cycling snobbery — and most people never get a straight answer about it.
The Quick Answer — Why Road Bikes Use Presta Valves
Here’s the thing nobody tells you upfront: it’s about the rim.
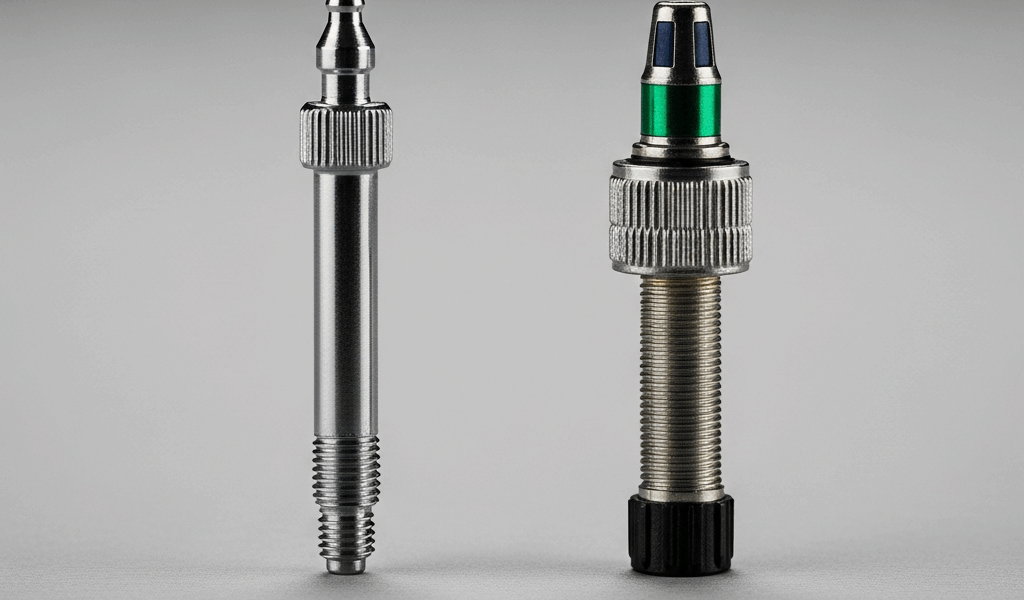
Road bike rims are narrow. We’re talking rims that might be 19mm to 23mm wide on the internal channel, sometimes less on older clincher designs. Drilling a Schrader valve hole — which needs about 8mm of diameter — into a rim that narrow removes a significant chunk of material right at the bead seat. That’s a structurally critical area. The Presta valve body, by contrast, is only 6mm in diameter. Two millimeters sounds trivial. On a narrow, lightweight aluminum or carbon rim running 100–130 psi, it’s not trivial at all.
Drilled by a manufacturer trying to shave weight and maintain strength, the Presta valve hole preserves more rim material at exactly the point where the tire bead hooks onto the rim. That’s the primary engineering driver. Not tradition. Not elitism. Geometry and load-bearing capacity.
The secondary reason is pressure. Schrader valves use a spring-loaded pin to keep air in. That spring has a certain resistance rating, and at very high pressures — say, 120 psi in a 23c road tire — that spring can actually make it harder to seat a pump head correctly and get an accurate reading. Presta valves use a threaded brass nut instead of a spring. No spring resistance. The air pressure itself helps keep the valve sealed, which is actually more reliable at road bike pressures than the Schrader system.
Mountain bikes run lower pressures (often 25–35 psi in tubeless setups) on wider rims. Schrader works fine there. Makes perfect sense once you see the full picture.
Presta vs Schrader — The Practical Differences
Probably should have opened with this section, honestly — it’s what most people actually need day-to-day. Here’s a direct comparison across the specs that matter to you as a rider.
| Feature | Presta | Schrader |
|---|---|---|
| Valve diameter | 6mm | 8mm |
| Sealing mechanism | Threaded lock nut | Spring-loaded pin |
| Pressure range | Up to 160+ psi | Typically up to ~65 psi reliably |
| Pump compatibility | Requires Presta-specific or dual-head pump | Compatible with car pumps, gas stations |
| Ease of use for beginners | Lower — requires unscrewing lock nut first | Higher — just press and pump |
| Common bike types | Road, gravel, higher-end MTB | MTB, hybrid, BMX, cruisers |
| Valve core removable | Yes — useful for tubeless sealant | Yes, but less commonly done |
The pump compatibility gap is the one that bites people. A Topeak Joe Blow Sport III floor pump (around $55–$60 at most shops) has a dual-head that handles both valve types. That’s the pump I recommend to every new road cyclist without hesitation. Buy it once, stop thinking about it forever.
Schrader wins on convenience. Walk up to any air compressor at any gas station in North America and fill your tires. Done. Presta requires either carrying your own pump or a small brass adapter — more on that in a second.
Presta wins on performance at high pressure. The nut-based seal is more precise, air loss between pumping sessions is genuinely lower, and at 110 psi you’re not fighting spring tension to get the pump head attached.
Can You Switch to Schrader on a Road Bike
Technically yes. Practically — don’t.
You can buy a drill bit, carefully enlarge the valve hole from 6mm to 8mm, and run a Schrader tube. Some shops will even do this. The problem is that on narrow road rims, you’re removing material that wasn’t there to spare. On a carbon rim especially, introducing any non-factory hole modification is a warranty-voiding, structurally questionable move. I’ve seen a rim fail at the valve hole under high-pressure inflation. It’s not a dramatic explosion, but it will ruin your day and potentially the rim, which on a mid-range carbon wheelset could mean replacing a $400–$600 component.
Wider rims — some modern gravel rims at 25mm internal width and above — can accept Schrader drilling more safely. But even then, most gravel riders stick with Presta because their pumps already handle it.
The smarter solution is a Presta-to-Schrader adapter. It’s a small brass fitting, usually sold in a two-pack for around $4–$6 on Amazon or at any bike shop. Screw it onto your Presta valve, and now you can use any Schrader pump or gas station air. Remove it after. Keep one in your jersey pocket on long rides.
Adapters aren’t a perfect long-term solution — they add a tiny bit of weight to the valve, can rattle loose, and occasionally the threading doesn’t seat cleanly on older valves. But for emergency inflation on the road, they’re completely reliable.
How to Pump a Presta Valve Without the Wrong Pump
This is where new cyclists get stuck. The valve looks alien. Nothing happens when you try to pump. Here’s exactly what you do.
- Locate the lock nut. At the top of the valve there’s a small brass nut threaded onto the valve stem. That’s your lock nut. It keeps the valve sealed during riding.
- Unscrew it counterclockwise. Just a few turns — three to five rotations is usually enough. You’re not removing it. Do not remove it. I lost one on a ride once, mid-trail, and spent twenty minutes trying to improvise a seal with electrical tape. It didn’t work.
- Press the valve gently to confirm it’s open. You’ll hear a small hiss of air escaping. That means the valve is unseated and ready to accept the pump head.
- Attach your pump head. On a dual-head pump, flip the head to the narrow Presta side. Press it firmly straight onto the valve — not at an angle. Flip or tighten the pump lever to lock it.
- Pump to your target pressure. Road tires: check the sidewall for the printed pressure range. A 700x25c tire typically runs 90–110 psi. A 700x32c gravel tire might run 60–80 psi.
- Remove the pump head and immediately retighten the lock nut. Clockwise. Snug. Don’t crank it — you’ll cross-thread it. Just firm finger pressure.
The single most common mistake I see: someone skips step two and wonders why no air is going in. The pump gauge reads pressure but the tire doesn’t get harder. That’s the lock nut, still closed, blocking airflow completely. Unscrew it first. Every time.
If you’re using a CO2 inflator — say, a Genuine Innovations Ultraflate cartridge with a 16g CO2 canister — the same logic applies. Unscrew the lock nut before threading on the inflator head. CO2 inflators release fast and you only get one shot per cartridge, so get everything staged correctly before you actuate.
Presta valves aren’t hard to use. They’re just different. Once you’ve done it a dozen times it takes about eight seconds and you stop thinking about it entirely. The engineering behind it is genuinely clever — a lighter, more pressure-capable design that suits road cycling specifically. Not weird. Just purpose-built.


Stay in the loop
Get the latest cycling gear galaxy updates delivered to your inbox.