Why Your Helmet Fit Might Be Off
Helmet fit has gotten complicated with all the conflicting advice flying around. I’ve spent three years at a local bike shop — Ridge Line Cycles, if you’re curious — and what I can tell you is this: almost every fit complaint I hear falls into one of four buckets. Wrong shell size. Bad pad placement. A retention system that’s either broken or being used wrong. Or the painful one nobody wants to hear — you bought a helmet built for a skull shape that isn’t yours. Most riders assume they’ve got a defective product. Usually they don’t. Usually they have a sizing problem. That distinction matters, because the fix is free.
So, without further ado, let’s dive in. This isn’t the generic “measure your circumference” rundown you’ll find on every brand’s FAQ page. This is actual troubleshooting — for helmets that tilt, spin, dig in, or stay stubbornly loose no matter what you try.
Helmet Keeps Tilting Forward or Backward
Most common complaint I get. You’re an hour into a ride and the brim is creeping toward your eyebrows. Or it’s doing the opposite — rotating back and leaving your forehead completely exposed. The retention dial feels snug. The chin strap is on. The angle is still wrong.
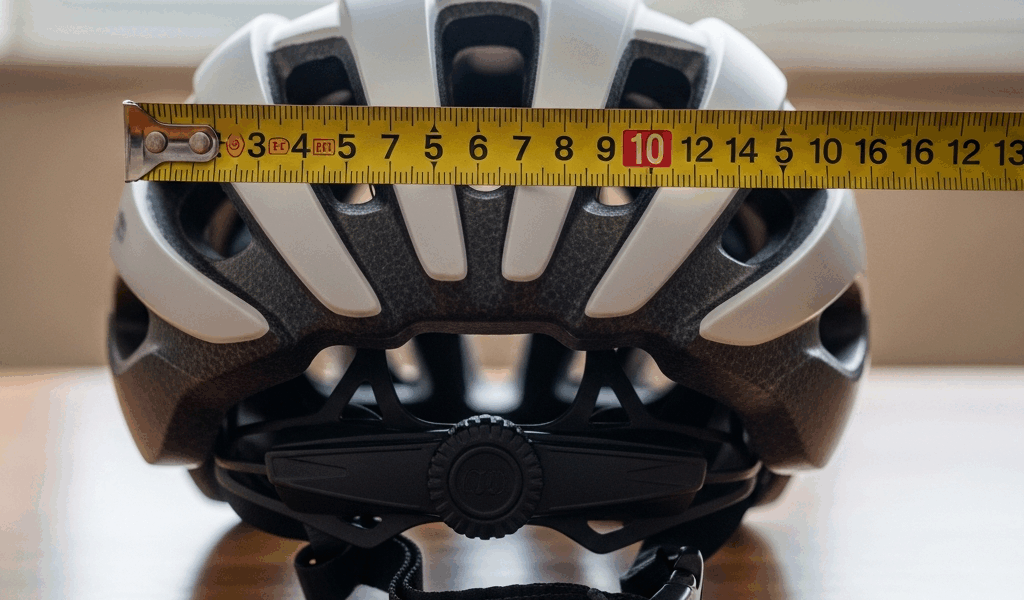
The culprit is almost always where your occipital cradle sits. That’s the hard plastic cup at the rear of the shell. It needs to land roughly at the base of your skull — that inflection point where your head starts curving down toward your neck. Too high, and it levers the front of the helmet downward. Too low, and the whole thing rotates back. Small positioning error, big result.
Here’s the fix. Loosen the chin strap completely and pull the helmet off. Flip it over and look at how the retention system connects to the shell. On most modern helmets — Bell Stratus, Giro Syntax, Specialized Propero — you’ll find a plastic cradle riding in a vertical track. Slide it down. Closer to the neck, further from the crown. Strap back on, tighten, then check your two-finger rule: two fingers should fit between your forehead and the brim. No more, no less.
Dial systems work slightly differently. Older Giro Synthe models and some Trek-branded helmets use a dial with discrete position slots rather than a continuous track. Try rotating to a lower slot. You’re chasing the same target — cradle at the skull’s base, not up on the round part.
One thing worth knowing: oval heads and round heads respond differently to all of this. Longer, narrower skulls usually need the cradle angled slightly forward. Rounder heads do better with it centered. You might need three or four attempts before it clicks. That’s not a flaw in the design. That’s exactly why the adjustability is there.
Retention Dial Spins but Helmet Still Feels Loose
You turn the dial. It keeps turning. Nothing tightens. The helmet still wobbles.
Two things cause this, and they need different solutions. Either the ratchet mechanism is stripped, or the shell is genuinely too large and you’ve hit the end of the dial’s range. You have to figure out which one before you do anything else.
The test is simple. Turn the dial counterclockwise until it stops — fully loosened. Look at the rear of the helmet and find the adjustment strap the dial pulls against. Now turn clockwise slowly. You should feel resistance almost immediately. The strap should visibly cinch around the back of your head. If the dial completes three full rotations with zero tension, zero feedback, zero movement in that strap — the ratchet is dead. Buy a replacement or retire the helmet.
But if it tightens and then stops — and you’re still getting movement — that’s a sizing mismatch. The shell is too big, full stop. A Giro Helios in large fits heads roughly 57 to 61 centimeters. If you’re sitting at 57.5, you might genuinely exhaust the dial’s inward range before the fit is secure. No amount of adjusting fixes that.
Probably should have opened with this section, honestly. Some helmets — Specialized’s recent Prevail and Align models, specifically — have a small recessed button near the dial that releases the mechanism entirely and lets you reset the starting position. Check the manual. Most people throw the manual away and never know this exists until they’re five seconds from the trash can.
Pressure Points and Hot Spots After an Hour
Your helmet isn’t tilting. It’s snug. It passes every basic check. But after 45 minutes you’ve got two red marks on your temples or a headache that starts exactly where the forehead pad ends. That’s a pad thickness problem, and it takes about four minutes to fix.
Most helmets ship with multiple pad thicknesses in the box. I’m apparently a medium-density person and the stock Giro pad works for me, while the thicker Bell pad never does. Don’t make my mistake of assuming whatever came installed is correct. Pull out the box your helmet shipped in and look for small plastic bags. You’ll often find a thin set and a thick set you never touched.
Pressure points form in three predictable zones: temples, forehead, and the rear base of the skull. Identify yours. Peel the adhesive pads from that zone — they come off cleanly if you go slow — and swap in the thinner version. Thinner pads back the contact point slightly inward, which relieves localized pressure. Counterintuitively, thicker pads can actually worsen specific hot spots by pushing harder against a smaller area.
Temple pain: go thinner. Forehead or back-of-head ache: try thicker first, then reassess. Bell, Giro, and Specialized all sell aftermarket pad kits — usually $12 to $18 — if your originals are long gone or have turned into compressed cardboard after two summers. Which brings me to the thing I learned the hard way. Foam degrades. After about 18 months of regular use it compresses permanently. What fit perfectly in year one starts creating new pressure points by year three. Swapping pads won’t fix degraded foam. That’s the line where replacement actually makes sense.
When the Fix Is Just Getting the Right Helmet
Sometimes you’re not fighting a fit problem. You’re fighting geometry. But what is head shape compatibility? In essence, it’s the match between a helmet’s internal mold and the actual three-dimensional contours of your skull. But it’s much more than that — it determines whether any amount of adjustment will ever get you comfortable.
Some helmets are engineered around round skulls. Others — frequently labeled “Asian fit,” though the geometry applies broadly — accommodate longer, more oval heads with a completely different internal profile. Road aero helmets tend to be narrow and elongated by design. Mountain helmets run rounder. A person with a genuinely round skull might spend two years fighting a road-specific aero shell and never land on a comfortable fit. That’s what makes proper shell matching so endearing to us obsessive cyclists — when it’s right, it’s immediately right. When it’s wrong, no amount of fiddling closes the gap.
How do you know you’ve hit this wall? If you’ve moved the cradle, swapped pads, reset the dial, and you’re still chasing the same pressure points or the same tilt — the helmet’s internal shape probably isn’t compatible with your head. That’s not your fault. It’s geometry, not effort.
Before your next purchase, try helmets on in person. Spend five minutes in the store wearing it — no dial cranked, no straps tightened, just resting naturally on your head. The right helmet feels approximately right within the first 30 seconds. If you’re immediately aware of it, immediately negotiating with it, put it back. Your head will thank you somewhere around mile 40.


Stay in the loop
Get the latest cycling gear galaxy updates delivered to your inbox.